
RESTful이라는 규약이 있다. 이것은 GET, POST, PUT, DELETE에 관련된 것이다.
1. GET - /data : 모든 데이터를 요청한다.
2. POST - /date : 데이터를 추가한다.
3. PUT - /data : 데이터를 모두 수정한다.
4. DELETE - /data : 데이터를 모두 제거한다.
그리고 데이터들은 아래와 같은 형태를 가지고 있다.
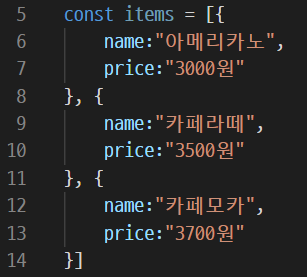
배열 안에 객체의 형태를 가지고 있다는 것을 알 수 있다. 따라서 아래와 같은 형태도 가능하다.
1. GET - /data/n : n번째 데이터를 요청한다.
2. POST - 불가능
3. PUT - /data/n : n번째 데이터를 수정한다.
4. DELETE - /data/n : n번째 데이터를 제거한다.
위의 PUT - /data와 DELETE - /data 같은 경우는 코드에 모든 데이터를 건드리기 때문에 잘 사용되지 않는다. 따라서 위의 8개의 방식중에 가장 많이 사용하는 것은 아래와 같다.
1. GET - /data : 모든 데이터를 요청한다.
2. POST - /data : 데이터를 추가한다.
3. GET - /data/n : n번째 데이터를 요청한다.
4. PUT - /data/n : n번째 데이터를 수정한다.
5. DELETE - /data/n : n번째 데이터를 제거한다.
위의 5개를 주로 사용하게 된다.
먼저 project폴더(다른 이름으로 해도 무관하다.)에 index.html 파일을 생성하고 아래와 같이 내용을 작성한다.
|
1
2
3
4
5
6
7
8
9
10
11
12
13
14
15
16
17
18
19
20
21
22
23
24
25
26
27
28
29
30
31
32
33
34
35
36
37
38
39
40
41
42
43
44
45
46
47
48
49
50
51
52
53
54
55
56
57
58
59
60
61
62
63
64
65
66
67
68
69
70
71
72
73
74
|
<!DOCTYPE html>
<html>
<head>
<meta charset="utf-8" />
<title>express</title>
<script src="jquery-3.4.1.js"></script>
</head>
<body>
<h1>Hello World Static File</h1>
<button id="get-all">데이터 모두 가져오기</button>
<button id="post-all">데이터 추가하기</button>
<button id="get-one">0번 데이터 가져오기</button>
<button id="put-one">0번 데이터 수정하기</button>
<button id="delete-one">0번 데이터 제거하기</button>
<textarea name="" id="output" cols="40" rows="10"></textarea>
<script>
$("#get-all").click(function () {
$.ajax({
url: "/drink",
method: "GET",
dataType: "text",
success: function (data) {
$('#output').val(data)
console.log(data)
}
})
})
$("#post-all").click(function () {
$.ajax({
url: "/drink",
method: "POST",
dataType: "text",
success: function (data) {
$('#output').val(data)
console.log(data)
}
})
})
$("#get-one").click(function () {
$.ajax({
url: "/drink/0",
method: "GET",
dataType: "text",
success: function (data) {
$('#output').val(data)
console.log(data)
}
})
})
$("#put-one").click(function () {
$.ajax({
url: "/drink/0",
method: "PUT",
dataType: "text",
success: function (data) {
$('#output').val(data)
console.log(data)
}
})
})
$("#delete-one").click(function () {
$.ajax({
url: "/drink/0",
method: "DELETE",
dataType: "text",
success: function (data) {
$('#output').val(data)
console.log(data)
}
})
})
</script>
</body>
</html>
|
cs |
그리고 자바스크립트 파일을 만들고 코드를 작성하고, 아까 만들었던 project 폴더와 static 메서드로 연결해준다.
|
1
2
3
4
5
6
7
8
9
10
11
12
13
14
15
16
17
18
19
20
21
22
23
24
25
26
27
28
29
30
31
32
33
34
35
36
37
38
39
40
41
42
43
44
45
46
47
48
|
const express = require('express')
const app = express()
const items = [{
name: '우유',
price: '2000'
}, {
name: '홍차',
price: '5000'
}, {
name: '커피',
price: '5000'
}]
app.use(express.static('project'))
app.get("/drink", (request, response) => {
response.send(items)
})
app.post("/drink", (request, response) => {
items.push({
name: "테스트",
price: "테스트"
})
response.send(items[items.length - 1])
})
app.get("/drink/:id", (request, response) => {
const id = Number(request.params.id)
response.send(items[id])
})
app.put("/drink/:id", (request, response) => {
const id = Number(request.params.id)
items[id].name = "테스트"
items[id].price = 1000
response.send(items[id])
})
app.delete("/drink/:id", (request, response) => {
const id = Number(request.params.id)
items.splice(id, 1)
response.send("success")
})
app.listen(52273, () => {
console.log('Server Running at http://127.0.0.1:52273')
})
|
cs |
완성을 하고 Node.js로 실행을 하면 아래와 같은 결과가 나오게 된다.
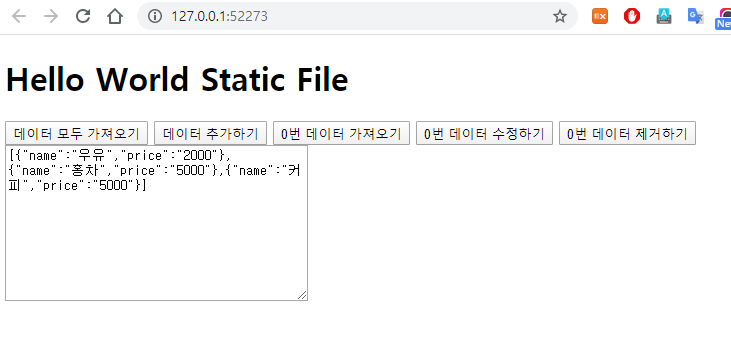
각각의 버튼을 누르면
1. GET - /data : 모든 데이터를 요청한다.
2. POST - /data : 데이터를 추가한다.
3. GET - /data/0 : 0번째 데이터를 요청한다.
4. PUT - /data/0 : 0번째 데이터를 수정한다.
5. DELETE - /data/n : n번째 데이터를 제거한다.
위의 내용을 실행하게 되는 것이다.
HTML 코드에서 각각의 .click() 메서드를 실행 할 때 발생하는 이벤트에서 출력 할 때 dataType을 "text"로 한 것은 dataType 속성을 입력하지 않으면 textarea에 출력이 되는 내용의 가독성이 떨어지기 때문에 dataType 속성을 "text"로 입력해 문자열을 바로 출력하게 만든 것이다.
'프로그래밍 공부 > Ajax' 카테고리의 다른 글
| Ajax - GET, POST, PUT, DELETE 요청과 응답 데이터 주고 받기 (0) | 2020.01.08 |
|---|---|
| Ajax - jQuery로 GET 요청하기 (0) | 2020.01.06 |
| Ajax - express로 GET 요청 서버 만들기 (0) | 2020.01.03 |
| Ajax - Ajax 개요 및 Node.js 기본 (0) | 2020.01.02 |


